Azure Function 實作教學
前言
本篇文章專注於教學如何使用 Java 建立 Azure function 專案,從基本的專案環境建置 、如何開發業務邏輯程式、部屬到 Azure Function App 皆會有詳盡的介紹 。幫助讀者快速的了解、建構出 Azure Function 的服務 。
在開始進行教學前,建議先閱讀 Azure Function 的基本概念會比較好上手:
開發環境
Azure function 支援多種方式 (Maven , Eclipse , Vs Code) 建立專案,而本文選擇使用 Intellj Idea 進行開發:
- JDK 8 , 11 or 17
- 安裝 Maven 3.5.0 +
- 安裝 Azure CLI 2.4 或更新版本
- 安裝 Azure Functions Core Tools 4.x 版
在使用 Intellj 開發前,需安裝額外的外掛程式並登入
Plugin 搜尋 Azure ToolKit for Intellj -> 安裝並重啟 -> 上方列選擇 tool -> azure sign in 讓 local 環境取得雲端資源存取權限

建立專案
如同建立 spring Boot 專案,在 new project 選擇 Azure Functions 並填入專案相關資訊即可創立。
專案結構
1 | FunctionsProject |
此為 Java 的專案範例結構,由於是透過 maven 進行管理,結構上大致與 Spring Boot 等 Maven 專案結構相同。各資料夾說明如下:
- FunctionApp : 原始碼根目錄。依照業務功能需求可再拆成 sub package 管理,要執行的 Azure Function 也會存放於此。
- host.json : 執行 Azure Function App 的系統參數設定。 ex: log 設定,監控設定,trigger 的全域設定
- local.settings.json : 本機 Debug 模式時所讀取的設定,設定資訊如同 Azure Function 的 App Settings.
- target : 執行 maven 後的打包檔,包含 azure function 對應的資訊,第三方套件等 ….
範例程式碼說明
撰寫程式碼前,Azure Function 有兩個核心的概念需認識:
- Trigger : 用於設定撰寫的程式碼被觸發的條件,Azure 支援多種不同的方式. Ex: Http , Timer , Queue ,Blob
- Binding : 當希望程式被觸發後有額外的輸入或輸出,可用此功能做設定
1 | package com.howhow.functions.handler; |
此範例程式為建立一個 HTTP 端口,並將 Request Body 收到的資料新增至設定 Azure Queue Storage 中
- 第 11 行:此 Annotation 用來定義 Function 的名字。 若未使用此標註,則在編譯時就不會產生這個 Function 的 Route
- 第 13 行:用於設定該 function 要被哪種條件觸發,每個 function 都需要設定 Trigger 的 Annotation 。 範例中則是透過 HTTP 作為觸發,並綁定 HttpRequestMessage 來取得相關請求資訊
- 第 18 行:用於設定該 function 額外的輸入與輸出資訊,每個 Function 可設定 0 至多個 Binding 及相關綁定的參數 .
讀取 Trigger 額外資訊
在業務邏輯程式若需要讀取除了 Trigger 其他的額外資訊,可以透過 @BindingName 來設定要取得的 Trigger meta data.
各 Trigger 可使用的 Meta data 詳情請查看官方文件
1 | public class Function { |
在上述範例中,queryValue 會取得從 HTTP 請求中的查詢字串參數 name。
以下是另一個範例,示範如何從 Queue Trigger 取得相關 Message 的 Id。
1 |
|
Log 輸出
如果要在程式寫入 Log 資訊,則是透過 ExecutionContext 中定義的 getLogger 。而 Execution Context 除了 Logger, 也能取得其他額外資訊,詳請請看官方文件
1 | public String echo( |
讀取外部參數 、環境變數
在專案開發中,有些設定會依照不同環境來變動,像是連線,認證資訊 等 。這些資訊通常都會設定在 App Settings ,
App Settings 的資訊在執行期間會被視為環境變數,因此可使用 System.getenv("AzureWebJobsStorage") 來存取這些設定。
1 | public String echo( |
測試與除錯
Plugin Debug
Intellj 的 Azure Plugin 支援本機 Debug , 用法如同 SpringBoot 除錯,會模擬一個 service 來進行除錯。
但在本機除錯時,plugin 會存取專案根目錄中的 local .settings.json 來做為 App Setting
在執行除錯前,可至 設定中調整要讀取的 App Setting , 此服務佔用的 port 或 jvm 相關的參數
![image-20240108112756092]()
設定中斷點後執行 Debug , 即可查看該中斷點以前的資訊
![]()


手動觸發 Function
開發的 Azure Function 條件若需要在特定情境中才能被觸發,但這個情境又難以達成時,可以透過發送 HTTP 請求的方式來進行觸發。
Ex: 排程,Queue ,Blob
設定要觸發 Function 的端點,規則如下:
![Define the request location: host name + folder path + function name]()
hostname : 設定你的 function 網域名稱。本機的話就是 Localhost
Function Name : 使用 @FunctionName 設定的名字
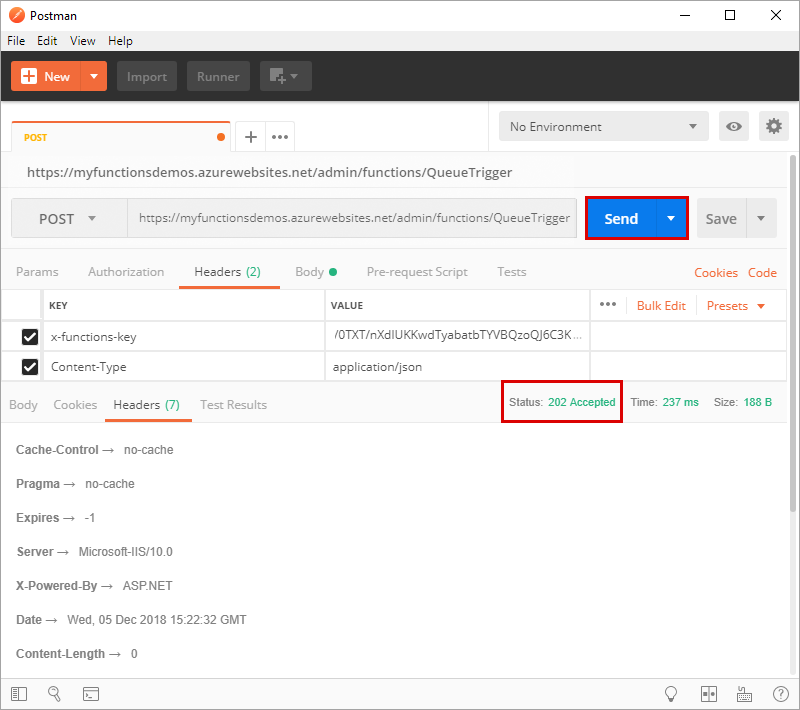
HTTP method : 方法統一採用 POST , content-type 則是 application/json
認證資訊:部屬的 function 因資安考量,不會開放給所有人觸發。因此需從 function 取得 Mater key 並在 Http Header 中設定
x-functions-key
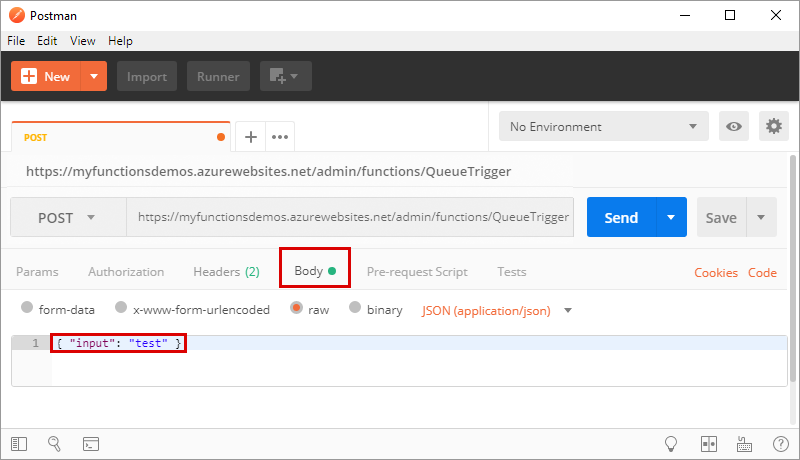
設定要帶的參數
有些 Trigger 會綁定一些輸入資訊,此時在 Body 中帶入 {“input”:”${相關資訊}”}
![Postman body settings.]()
如果有成功回應,代表 function 被觸發
![Send a request with Postman.]()

部屬到 Azure Function App
Azure Function 支援多種部屬方式,包括持續,手動部屬的選項。同時也支援容器化的部屬方法
CD (持續部屬)
- GitHub Action
- Azure Pipeline
- Jenkins
手動部屬
- Azure CLI
- REST API
- Containers
本篇文章僅會教學使用 GitHub Action 完成 CD , 使用 Azure CLI 手動部屬的方法,剩下的方法請參照官方文件閱讀
GitHub Action
設定 GitHub Workflow 能存取 Azure Function 資源的權限
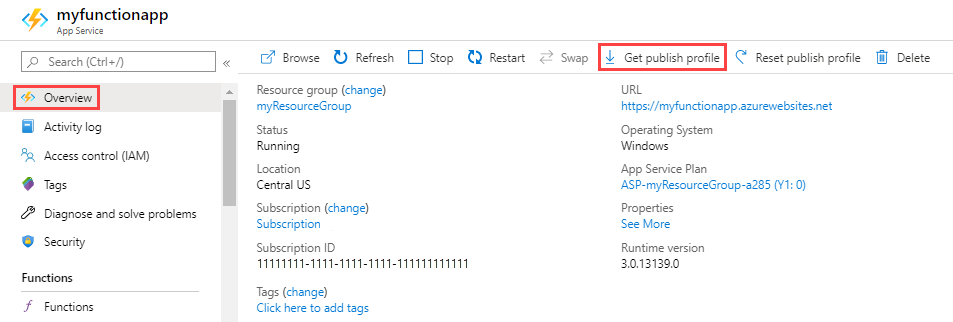
下載 publish profile
於 Github Secret 中新增
AZURE_FUNCTIONAPP_PUBLISH_PROFILE變數,並將publish profile的內容貼至對應的值中![Download publish profile]()
於專案路徑
/.github/workflows/設定 github workflow 的 Yaml 檔1
2
3
4
5
6
7
8
9
10
11
12
13
14
15
16
17
18
19
20
21
22
23
24
25
26
27
28
29
30
31
32
33
34
35
36
37
38
39
40
41name: Deploy Java project to Azure Function App
on:
push:
branches:
- main
workflow_dispatch:
env:
AZURE_FUNCTIONAPP_NAME: 'your-app-name' # set this to your function app name on Azure
POM_XML_DIRECTORY: '.' # set this to the directory which contains pom.xml file
JAVA_VERSION: '8' # set this to the java version to use (e.g. '8', '11', '17')
jobs:
build-and-deploy:
runs-on: windows-latest
environment: dev
steps:
- name: 'Checkout GitHub Action'
uses: actions/checkout@v3
- name: Setup Java Sdk ${{ env.JAVA_VERSION }}
uses: actions/setup-java@v1
with:
java-version: ${{ env.JAVA_VERSION }}
- name: 'Restore Project Dependencies Using Mvn'
shell: pwsh
run: |
pushd './${{ env.POM_XML_DIRECTORY }}'
mvn clean package
popd
- name: 'Run Azure Functions Action'
uses: Azure/functions-action@v1
id: fa
with:
app-name: ${{ env.AZURE_FUNCTIONAPP_NAME }}
package: '${{ env.POM_XML_DIRECTORY }}' # if there are multiple function apps in same project, then this path will be like './${{ env.POM_XML_DIRECTORY }}/target/azure-functions/${{ env.POM_FUNCTIONAPP_NAME }'
publish-profile: ${{ secrets.AZURE_FUNCTIONAPP_PUBLISH_PROFILE }}
respect-pom-xml: true於 Action 上檢視是否成功執行
![]()

Azure CLI 部屬
執行 mvn clean install 打包專案
1
mvn clean install
將
./target/azure-functions中的 project 資料夾轉成 zip 檔執行 Azure cli 的以下指令進行部屬
- -g : function 的 resource group
- -n: function app 的 name
- –src: 本機 zip 檔的位置
1
2
az functionapp deployment source config-zip -g <resource_group> -n \
<app_name> --src <zip_file_path>登入 azure portal 查看部屬情況
![]()

監控 Azure Function
當程式上線後,若發生重大異常,錯誤,開發人員很難去得知。因此 Azure Function 提供整合 Application Insight 的方法來進行持續監控,
透過設定好的預警門檻,來觸發對應的信件通知系統來完成自動化的監控。
筆者將會於下篇文章教學如何實現 Azure function 整合 Application insight 的監控功能。